将 Btrfs root 分区转换为 subvolume
条评论Btrfs 是具有 subvolume、快照等高级功能的写入时复制(copy-on-write)文件系统。Fedora、Ubuntu 桌面版系统在安装到 Btrfs 分区时会为根目录 / 和 home 目录 /home 分别创建不同的 subvolume。但是,Ubuntu Server 默认不会创建任何 subvolume。本文介绍如何将 Btrfs 分区中的根目录转换为 subvolume。
本文中使用的环境是 Ubuntu Server 22.04 LTS,已用 ISO 镜像安装到 Btrfs 分区,未安装其他软件。
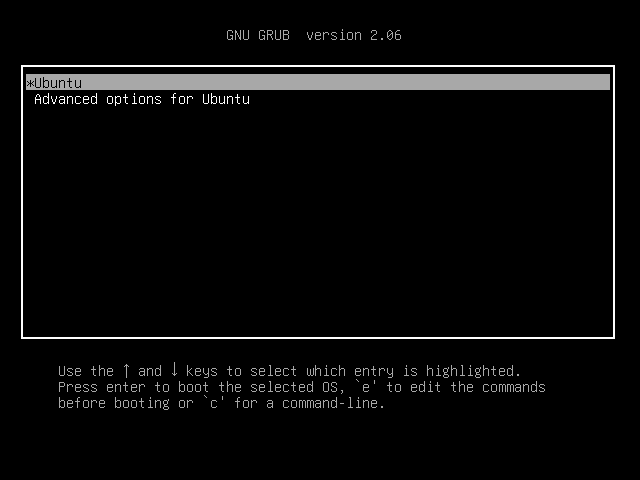
进入恢复模式
启动系统并按住左 Shift 键,直到出现 GRUB 选择菜单,选择“Advanced options for Ubuntu”然后选择“Recovery mode”。
进入恢复模式后,如果界面被日志打碎,请用键盘上下键移动光标,直到可以看清选项,然后选择“root”,按两次回车进入。
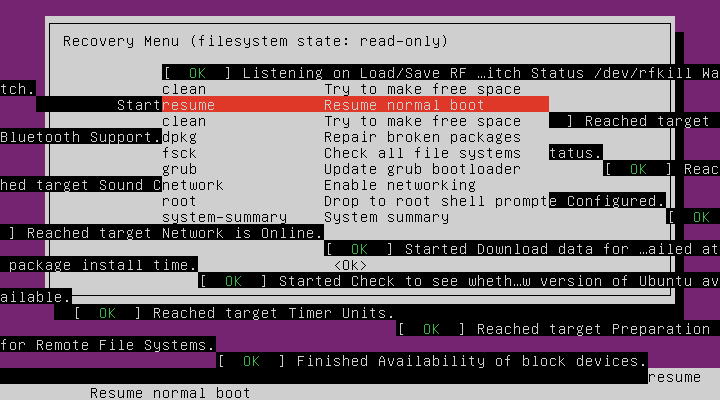
Ubuntu 的恢复模式会默认挂载根目录。如果你用的是其他系统的恢复模式,可能需要手动挂载。手动挂载时推荐挂载到 /mnt 目录,同时修改下面相关命令的路径。此后不再赘述。
修改 /etc/fstab
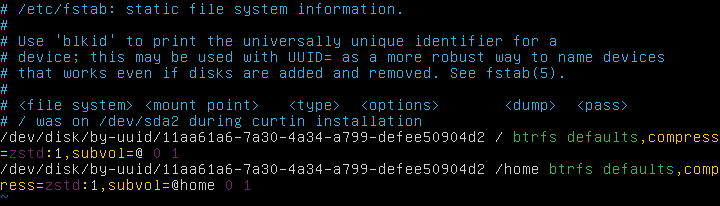
进入恢复模式后,执行 vi /etc/fstab 编辑文件。打开后,将光标移动到根目录那一行,按两次“y”键复制,并按“p”键粘贴。
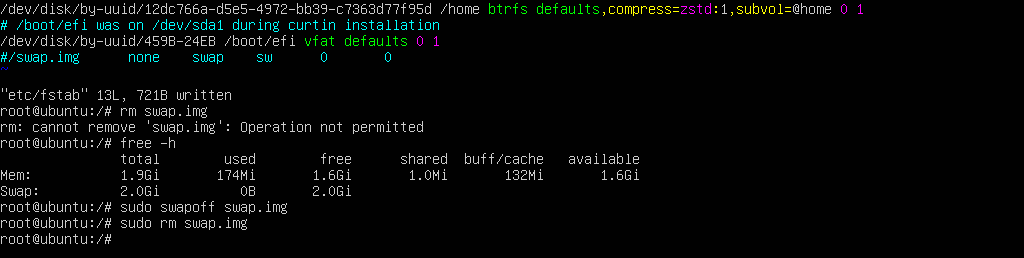
然后将第二行的挂载点改为“/home”,并在两行的挂载选项中分别添加“,subvol=@”和“,subvol=@home”。“@”和“@home”是 Ubuntu 风格的 subvolume 名。
同时可以添加“compress=zstd:1”选项来启用压缩。
对 swap 文件的额外操作
Btrfs 分区上的 swap 文件具有 nodatacow 属性,与 snapshot 等功能冲突。如果你的根目录中有 swap 文件,需要在 fstab 中注释掉,然后删掉文件。
创建 subvolumes
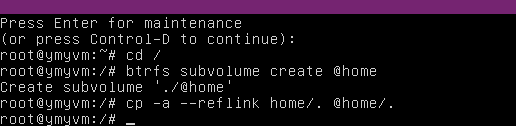
为 / 创建 subvolume
修改完 /etc/fstab 后,执行以下命令:
1 | cd / |
为 /home 创建 subvolume
执行以下命令为 /home 创建 subvolume:
1 | btrfs subvolume create @home |
重启进入系统,执行最后的操作
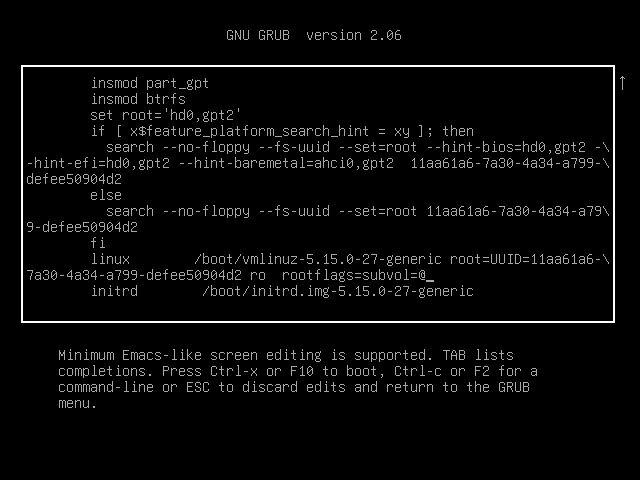
执行 reboot 重启,启动时按住左 Shift 键,出现 GRUB 选择菜单后,按“e”进入编辑模式,在“linux”开头的一行末尾添加“rootflags=subvol=@”,然后按 Ctrl+X 启动系统。
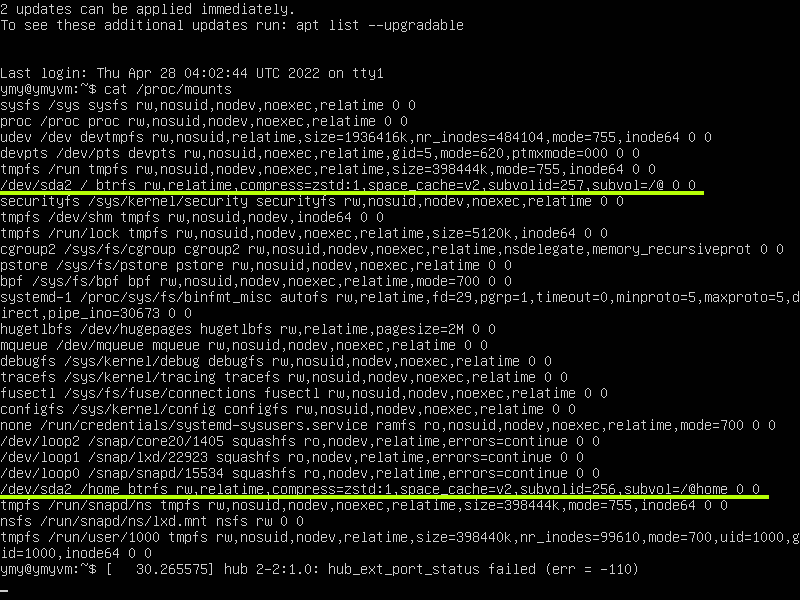
检查是否挂载了正确的 subvolume
系统启动后执行 cat /proc/mounts,检查是否挂载了正确的 subvolume。
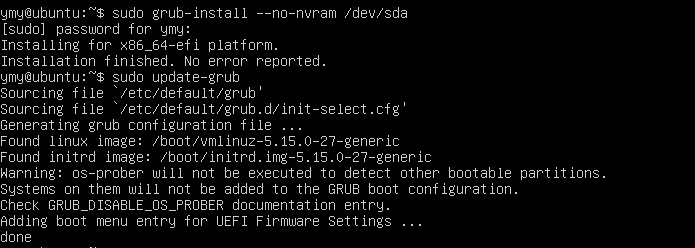
更新 GRUB 配置
执行以下命令更新 GRUB:
1 | sudo update-grub |
其中 /dev/sda 是 GRUB 所在磁盘,一般就是根分区所在的磁盘。若有不同,请用实际的磁盘替代。
完成后,用 sudo reboot 重启,不要按住 Shift,直接进入系统,并再次检查是否挂载了正确的 subvolume。
清理
原来的文件还残留在根目录,要想清理,可以先用 sudo mount /dev/sda2 /mnt 挂载——其中 /dev/sda2 为根分区——然后转到 /mnt 目录并删除除了“@”和“@home”以外的所有文件。

要清理 /home 中的残留,执行:
1 | cd /mnt/@ |
重新创建 swap 文件
请参考 https://askubuntu.com/questions/1206157/can-i-have-a-swapfile-on-btrfs/1206161#1206161。